You use the General Configuration screen to select general Micronet settings such as whether your company uses the Kitting and/or Job Costing modules, and whether you use item serial numbers and/or warehouse numbers. You can also set the screen colour for your company and enter the field names you want displayed for address lines throughout Micronet.
Refer to "Selecting a Company to Edit"
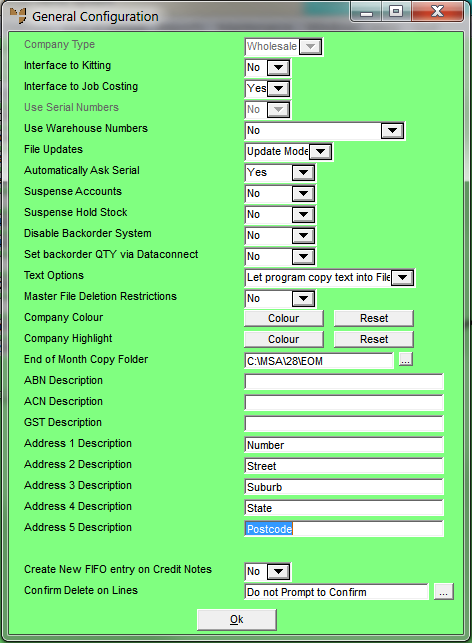
Micronet displays the General Configuration screen.
|
|
Field |
Value |
|---|---|---|
|
|
Company Type |
In the pre-GST versions of Micronet, this field was used to indicate whether you were a wholesaler (purchases or imports were generally exempt of sales tax) or a retailer (purchases including sales tax) so that sales tax could be calculated properly throughout the system. With GST, this field has been disabled. |
|
|
Interface to Kitting |
Select Yes if you are running the Micronet Kitting System (MKS) or No if you are not. |
|
|
Interface to Job Costing |
Select Yes if you are running the Micronet Job Costing system (MJC) or No if you are not. |
|
|
Use Serial Numbers |
This field is only enabled if you have selected the FIFO Costing Option on the Purchasing Configuration screen, and if the Fifo Control by Item field on that screen is set to No – see "Edit - Program - Purchasing". Micronet enables you to track serial numbers (or batch numbers) for your stock items. Options are:
|
|
|
Use Warehouse Numbers |
Select the numbering system you want Micronet to use for invoices, credit notes, held invoices, purchase orders, backorders and MRF orders. Options are:
|
|
|
|
Technical Tip The numbering system range is from 100000–99999999. When the numbering for any transaction type reaches 99999999, it will wrap around and start again. However, if transaction numbering is prefixed with the company number and the company number is longer than 7 characters, the range is only 100000–999999. |
|
File Updates |
Select whether you want Micronet to default to Add or Update mode when you access a master file record. Options are:
|
|
|
Automatically Ask Serial |
This field is only enabled when either:
The options are:
|
|
|
Suspense Accounts |
Select Yes if you want to allow suspense accounts in Micronet or No if you don’t. Having suspense accounts means users can process a customer’s order even if they are on hold, with the invoice suspended until you are ready to release the product/order to the customer. |
|
|
Suspense Hold Stock |
If you are using suspense accounts, when an order is processed and suspended, by default Micronet does not deduct the stock until the final invoice is processed. By selecting Yes in this field, you have the option to hold the stock so as to diminish your free stock for better overall stock control. |
|
|
Disable Backorder System |
Micronet provides the ability to enable or disable backorders for individual customers. However, if your company does not have backorders at all, setting this option to No switches off the entire backorder process throughout Micronet. |
|
|
Set backorder QTY via DataConnect |
This field only applies if you are using a Data.Connect routine to bring picking slips into Micronet after they have been picked on PDAs. When this field is set to Yes, if an item is in stock, it will simply be included on the imported picking slips as normal. However, if an item is not in stock, Micronet will create a backorder for the item. |
|
|
Text Options |
In previous versions of Micronet, the text on invoices, orders, etc. was linked to the main transaction and was not stored in the actual transaction line file. In V2.1 and later, this has been changed. Options are:
|
|
|
Master File Deletion Restrictions |
Select whether master file records can be deleted. Even if there are no deletion restrictions, warnings will be displayed if a user tries to delete a record which will have consequences in other areas of Micronet. |
|
|
Company Colour |
If you want to change the colour of the background on Micronet screens, select the Colour button, choose the colour you want then select Ok. You need to log out of Micronet and log back in for the new colour to take effect. Select Reset to return to the default colours. |
|
|
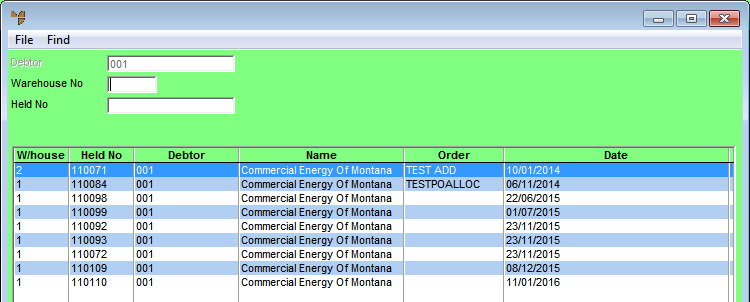
Company Highlight |
Micronet displays alternate lines on partial search screens in a different colour so it’s easier to distinguish between the lines (as shown on the screen below). If you want to change the colour of the alternate lines, select the Colour button, choose the colour you want then select Ok. You need to log out of Micronet and log back in for the new colour to take effect.
Select Reset to return to the default colours. |
|
|
End of Month Copy Folder |
Select the browse (...) button to select the folder where Micronet will automatically copy data when an End of Month is processed. |
|
|
ABN Description |
An ABN (Australian Business Number) field is displayed on various screens, reports and inquiries throughout Micronet. If you would prefer to use a label other than "ABN", enter the label you want to use. Wherever ABN is displayed in Micronet, it will be replaced with the label you enter. |
|
|
ACN Description |
An ACN (Australian Company Number) field is displayed on various screens, reports and inquiries throughout Micronet. If you would prefer to use a label other than "ACN", enter the label you want to use. Wherever ACN is displayed in Micronet, it will be replaced with the label you enter. |
|
|
GST Description |
A GST (Goods and Services Tax) field is displayed on various screens, reports and inquiries throughout Micronet. If you would prefer to use a label other than "GST", enter the label you want to use, e.g. you might prefer to use the label "VAT". Wherever GST is displayed in Micronet, it will be replaced with the label you enter. |
|
|
Address 1, 2, 3, 4, 5 Description |
Enter the field labels you want displayed on Micronet screens that show address details. For example, you might define the address lines as follows:
These address labels default wherever the delivery or postal address details are displayed in Micronet. So, instead of asking users to enter Address 1, 2, 3, 4, 5, Micronet will now ask for, e.g. Delivery Address Line 1, Delivery Address Line 2, Delivery Suburb, Delivery State and Delivery Postcode. You can enter whatever labels you want and you don't have to use all five address lines. |
|
|
|
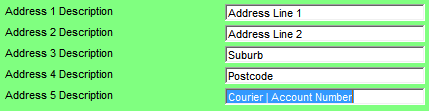
Technical Tip In the Address 5 Description field, you can add a pipe | to add two additional fields to any screens throughout Micronet where addresses are displayed. For example, entering "Courier | Account Number" in this field (as shown below) will add the Courier and Account Number fields below the address fields.
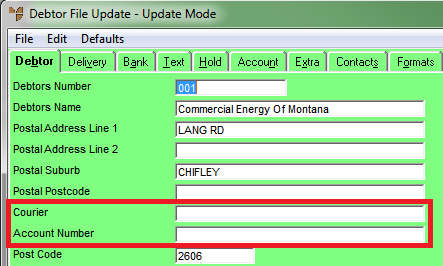
For example, here are the address fields in the Debtor master file:
|
|
Create New FIFO Entry on Credit Notes |
When generating a credit note for items with serial numbers, you have the option to either create a new FIFO entry or credit the original item serial number back into stock. Select Yes if you always want to add a new serial number entry in the FIFO file when items are credited. Even if items with the same serial number exist in the FIFO file, the credited items won't be merged with those items. Select No if you want Micronet to try to find the original serial number that was used when generating the invoice and add the credited item back to that serial number. This merges credited items back into the original serial number entry in the FIFO file so they appear together. However, if Micronet cannot find the original serial number entry, it will create a new entry in the FIFO file. |
|
|
Confirm Delete on Lines |
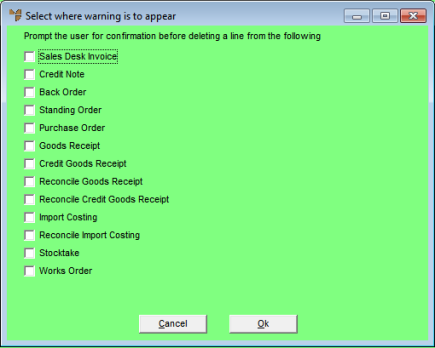
Select whether a warning should be displayed to users when they delete a line on a transaction. This means users will have to confirm the deletion before proceeding, preventing them from accidentally deleting a line. The default is "Do not prompt to confirm", which means that no warning will be displayed. If you want a warning displayed to users when they delete lines, select the browse (...) button next to this field. Micronet displays the Select Where Warning is To Appear screen.
Check the box next to each transaction type on which the warning should be displayed then select the Ok button. Micronet redisplays the General Configuration screen with the selections listed in this field. |
|
|

|
Technical Tip You can also set Confirm Delete on Lines per user rather than for the whole company – see "Maintenance - Edit UserIDs - 4. MDS Security". |
Micronet redisplays the Change Existing Company screen.
Refer to "Logging in With Updated Configuration (Method 1)" or "Logging In With Updated Configuration (Method 2)".